Category Archives: 1 checked june 2025

A very elegant piece of algebra

I set this problem today, during a lesson in which we had been looking at simultaneous equations with 2 unknowns:

A + B = 92

A + c = 57

B + C = 59

M came up with this answer:

clever algebra


POSTSCRIPT –

M then set me this problem:

A-B = 25

B+C = 151

A+C = 176

which turned out to have an unexpected twist in it….. Have fun!

Subtraction Confusion – a very simple solution

Do any of your students get in a mess with “double borrowing”? There’s a very simple solution which builds on their existing knowledge of subtraction with borrowing….

Easy subtraction - one "layer" of borrowing

Easy subtraction – one “layer” of borrowing

Much harder subtraction - the borrowing cascades from left to right
Much harder subtraction – the borrowing cascades from left to right and is very likely to go wrong.

There is a very simple solution to this, encourage the student to look at the number differently. Borrow ONCE from the “200” on the top, which becomes 199.

Borrow ONCE from the "200" in the top number

Borrow ONCE from the “200” in the top number – now this sum is ready to do, and there’s far less that can go wrong.

Try it on a student near you, and use the reply box to tell readers what happened next!

Chinese Multiplication, or how to multiply together VERY large numbers!

Chinese multiplication has been explained many times in many places on the Internet. This is a quick recap of the way I do it….

The kids I’ve taught, especially the more able ones, really like this way of multiplying numbers because it’s SOOOO easy to build up to very large numbers.

Within 20 minutes, a group of ambitious mathematicians has commandeered the class whiteboard and tried to do an ENORMOUS sum like 185936296722 x 15436796 and got an answer. This gives the teacher a problem. How can the sum be checked?  Calculators and EXCEL will round the answer to only 10 or so significant figures, which is pretty hopeless for checking the work.

Here is a link to an EXCEL spreadsheet  that will do these HUGE sums so you can check pupils’ (or your own) work.

The extra challenge that these interpid mathematicians give themselves, of course, is how to add together huge long lists of numbers. Here’s an example of one of the additions in the sum mentioned above:

One of the additions needed to do the sum...

One of the additions needed to do the sum…

The student has to add 4,1,7,5,2,1,2,5,7,1,4,2,5,1,2 and 0. It’s tough to add all that without errors, so encourage them to look for TENS, and cross them out, “carrying” them into the next column…

They could make ten from the 4,1 and 5, then another from 7,2 and 1, and anotherfrom 1,4 and 5. Cross them out neatly and there’s not really much more to add! The nice thing is you can tackly any column you like, in any order, which is great for mathematicians who don’t know their right from their left! (except of course the TENS have to move left!).

Most of the numbers made TENS! Each ten has been done in a distinct colour for clarity.

Most of the numbers made TENS! Each ten has been done in a distinct colour for clarity.

About half the adding done now...

About half the adding done now…

Once this TEN-hunting is complete, the final pass is to add up any digits that are left.

Most of the adding done now...

Most of the adding done now…

completed sum

Completed! The answer!

Finally, some thoughts about the process of learning Chinese Multiplication:

  • It’s great practice USING TABLES
  • It’s great practice at ADDING long lists of numbers
  • Pupils will normally self-differentiate and settle with the size of sum that suits them. For GCSE only a 2-digit by 3-digit sum is normally required (which seems a shame really!)
  • They take time to learn how to draw the grids, and need to practice regularly. Sadly this pus some schools off teaching the method as “THE” method of multiplication. It is the most powerful, and handles decimals really easily too:
Decimal points in Chinese Multiplication

Decimal points in Chinese Multiplication

How to use your calculator to understand Standard Form.

These instructions work on a CASIO fx-83GT PLUS, which is widely used in schools and will, if you learn to drive it with confidence, do a tremendous number of different sorts of Maths.

If you want the calculator to give all its answers in standard form, follow this sequence:

  1. shift mode 7
  2. it will offer you a choice of Sci 0~9 and this means how accurately it will display the answers. 3 is OK, but you might want to experiment with 4 and 5 as well, to see for yourself what difference it makes.
  3. Try it, type in 23×3000= and you will get 6.90×10^4   (sorry! the ^ means to the power!!! The calculator is designed to display Maths properly and computers aren’t)
  4. To make your calculator display your answers normally again, shift mode 8 1 will do the trick. mode 8 is “Norm”, normal mode.

Red ring round the standard form button

Red ring round the standard form button

To type in a number that is in standard form, for example 4.5 x 10^12, use the button with x10x on it (it’s in the middle of the bottom row of buttons, and I will use square brackets to mean button) so the keystrokes you need, are    4.5 [x10x]12

Factorising Race

A game for 2 players. The winner is the player with most points at the end.

Starter (optional)

  • Play a game with the 13x table. This is almost completely unfamiliar and the kids will be intrigued. The KEY fact is that 7×13=91 because 91 is a terribly prime-looking number but it isn’t. Pupils who are confident with their other tables will, by learning this factorisation, have completed the full set of skills in factorising numbers under 100. 

Screen Shot 2014-05-13 at 16.50.05Introduction:

  • Make sure the players can factorise a number using their calculator. On the CASIO fx-83gt PLUS this is done by entering the number, pressing equals, SHIFT and ., ,,, (this has “FACT” written above it in yellow). The Prime Factor Form is displayed as the answer.

Each turn:

  • Roll 2 (or 3) dice, and choose which number to build. For example, a 5 and a 1 could be 15, 51 or 6. Factorise your chosen number. The score is the number of prime factors. eg 15 would score 2 for 3×5. 8 would score 3 because it is 2 cubed. 24 scores 4 because it is 2x2x2x3. 71 scores 1 because it is prime. ** You may need to explain the “Index Form” that the calculator displays. This is a very important notation anyway, which a lot of students misunderstand.

What Maths is learned:

  • To choose the best number, ideally the players have to mentally factorise both numbers. They will make repeated use of the standard divisibility tests (for 2, 3, 5 and 9) and probably invent a few more (this evening my pupil realised 357 and 217 must both be in the 7x table, just by looking at them.)
  • Once they know a number will divide, they have to actually DO it mentally. Practice makes perfect here!
  • A printed tables sheet may be a help.
  • In their enthusiasm to win they are stretching their own mental maths to the limit. If they don’t fully factorise both numbers, they may miss a high score!
  • A younger pupil may want to try all the possible numbers with the calculator – this is good practice anyway and reinforces the correct factorisations.
  • An enthusiastic player will start to memorise some of the factorisations – this is really helpful knowledge.

Nth term – finding algebraic rules for number sequences

Mathematical Language Covered

  • Function
  • Simplest Form
  • Mathematically equivalent
  • Sequence

You will need:

  • One Scientific Calculator each  (I use Casio fx-83GT Plus)
  • A4 Card – the best type has one coloured side, the other white – cut into tenths. You will need 3 or 4 pieces per pupil.
  • A group which is already reasonably good at supporting one another
  • Class Whiteboard

Introduction:20140513_165402

  1. Walk the class slowly and carefully through the key presses needed to put the calculators in TABLE more. (Mode 3) – like all ICT inputs, some will inevitably get lost and panic – this is where it’s important for them to be used to getting support from each other.
  2. Once they can all see F(X)=, ask them to input 10 =
  3. For “Start”, stick to 1 all lesson.
  4. For “End”,  input 10 =
  5. For “Step” input 1 =
  6. Ask them to describe what they can see. Including the column headings. Remind them to “mouse” down to see the bottom section of the table. Write the F(X)=10 and the sequence on the board.
  7. Press AC to clear the table and start again. This time try F(X)=12. Ask how they could make it more interesting, let them experiment. My lot came up with larger numbers but still the whole sequence was all the same number.
  8. How can you make the numbers change? Someone might already know – discuss and try F(X)=2X. This is achieved by keying in 2ALPHA (= because the ( button has X above it.
  9. Describe and write on the board the sequence this creates.
  10. Try 6X-1, describe, discuss.

Creating the Puzzles

Give out 2 pieces of card each. Create your choice of sequence, write it on the coloured side of the card. On the back write F(X)= and the function you used.

Discuss boundries – numbers under 10. (I should have set more – no decimals and no division yet. But it did make life interesting!

As they produce the cards, check the function – if it isn’t in simplest form, then simplify it with them and write that version underneath. Point out that their friends won’t be able to guess any more complicated version of the rule. eg if the rule they used was F(X)= 2X+3X+1 then the friends will guess 5X+1

If you think any of them are quite difficult, give them one or two stars. This will let the pupils self-differentiate.

Solving the puzzles

Put the cards down SEQUENCE SIDE UP and the pupils choose which one they want to do. Try to guess the F(X), key your guess onto the calculator, can you make that exact sequence? Once you have made it, turn over and check the rule on the card. Then initial the front of the card to note that you have done it.

Plenary:

What was easy? What was more challenging? Do we need another lesson on this (My group decided they found the minus ones harder so we pencilled in a lesson on handling negative numbers.

Cancelling Fractions. A game for 2-4 players.

cancelling-fractions-game

You will need:

Slow Rounds:

  • Play like this while they get used to the game.
  • Give out a card, read the fraction, ask them if they have it on their board? (Probably they will say no)
  • Ask which table both those numbers are found in? For example, if the card says 15/20, those two numbers are both in the 5 times table. Ask what position the 15 is in (answer, 3). What position is the 20 in (answer, 4). So, 15/20 is WORTH 3/4.
  • The pupil covers 3/4 with the card.
  • Take in turns until someone has 4 covered (or all covered, depending what pace you want).

Fast Rounds:

  • Play like this once they are really confident and getting bored with the pace…
  • Hand out one card each, fast, they grab it and place it on their board. Commiserate if it is a duplicate that they don’t need “Oh no, not another one EQUIVALENT to 3/4!”. If they are pleased, celebrate “Great, you needed 2/9”. This gets the correct terminology bedded in, and also they see that fractions that are equivalent to each other generally LOOK really different.
  • If 2 pupils draw (covering 4 fractions) have a tie break round with another card. At this pace, it works well to aim to cover all the factions up.
  • If someone goes “bingo” check their board to make sure all the cards are in the right place.

Super Fast Round:

  • Give each pupil 5 cards and see if anyone can go bingo.

Bonus level thinking:

  • “You need one more card. What do you want to get?” Suppose it is 2/5. Point out they need a fraction made up of a “position 2, position 5” pair. Placing one finger in each position explains this nicely. It’s very gratifying if they get what they want straight away!
  • Get the pupils to highlight the odd numbers before they start. Think about whether a fraction’s numbers are odd or even, or one of each, and which tables they should be looking in. Being hazy about the importance of odds and evens is common amongst struggling mathematicians.

Isometric Drawing with Year 6

challengeOne of my Year 6 groups tried some Isometric Drawing for the first time today. It’s perfectly possible for people to get hopelessly confused the first time they try this, but they all listened carefully, started simple (drawing one cube, then two) but it didn’t take long before they were digging into the box of Cuisinnaire Rode and setting themselves some really tough challenges. The most extreme one was this, six “ten” rods, piled up. Groans ensued and most of them decided it was impossible. However, some of them stuck at it and their drawings were brilliant!


Insometric drawing fourth answer Insometric drawing first answer Insometric drawing second answer

I noticed a couple of them had abandoned their pre-printed paper and were busy drawing soomething of their own on the class whiteboard:

Isometric drawing second challenge

The 90 times table (getting dizzy while teaching Maths)

I like Wednesdays. There are just seven pupils that I see twice a week, and they arrive, in a 3 and then a 4, on Wednesdays. When this “second lesson” was instigated, I tried just NOT planning anything, but to allow them to use it as a workshop to air their particular struggles with Maths. Today was unusual because there is a lot of illness in school at the moment so I just had Guy* and Becky*. On the way to the lesson….

Guy (jumping and landing a quarter turn around) We did 90 degrees today.

Oh yes, what happened?

We did (jumping some more) 90, 180, jump jump….
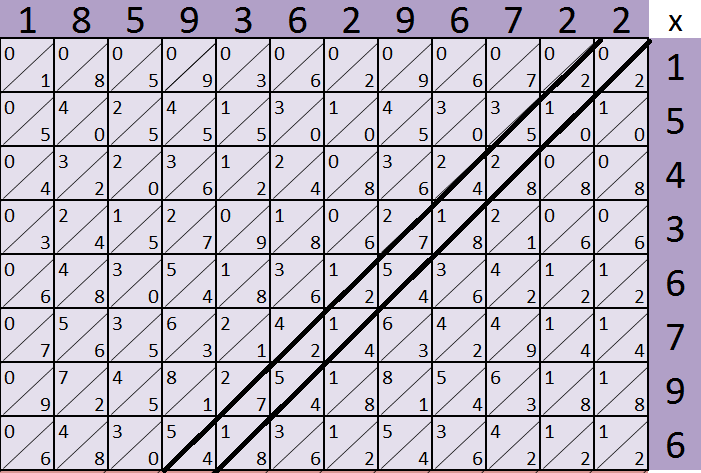
partial 90x table

partial 90x table

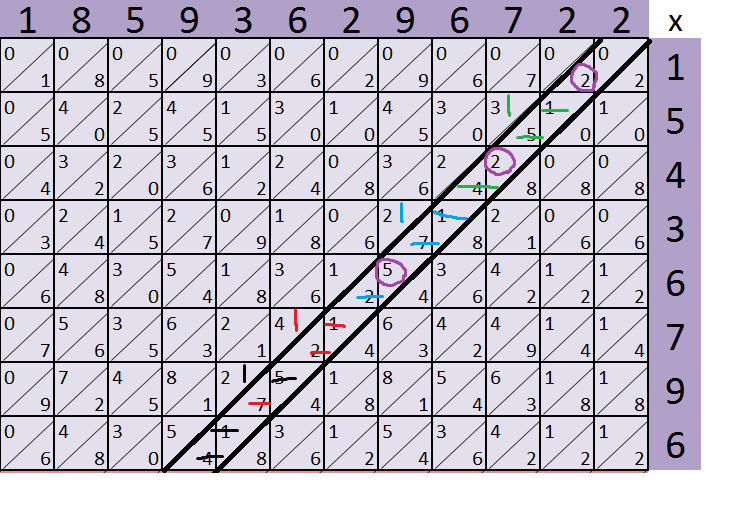
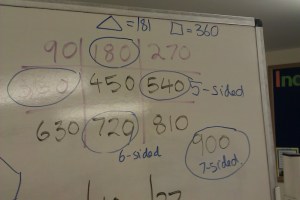
We had arrived in our teaching room by now, so I wrote up 90, 180 on the board. Thanks to Jan Poustie’s brilliant work on Dyscalculia**, I ALWAYS (and there’s not many things I’m strict about in lessons) write tables in a 3×3 grid. Poustie’s theory is that this makes them easier to memorise and recall, for kids who struggle to learn them. I’ve worked like that for 3 years now and there is more, so much more to it than that, but that’s for another blog post. So, anyway, up on the board goes 90, 180, and they supply 270, 360 and then get stuck. I asked them, did they stop there? Yes, that’s all the way round. But the table has 5 empty slots in it… what next? What does it look like?

Becky “It looks like the 9x table” .

90x and 9x table, in a 3x3 grid ref Jan Poustie

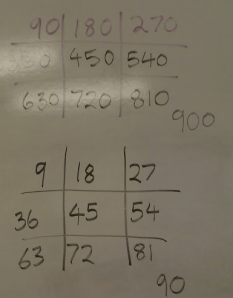
90x and 9x table, in a 3×3 grid ref Jan Poustie

OK you can trust that, let’s write up the 9x table (Lots of OOhs and Aahs favourite table because of the pattern in it, and because it also works so beautifully on your fingers). So up goes the 9x table with them providing all the numbers correctly. Back to the 90x table, it’s easy now cos we’ve got the 9x table as a crib…

So I volunteer to do the jumping bit if they chant…. 90, 180, 270, 360, 450, 540, 630, 720, 810, 900… now the room is gently spinning and I am facing away from the students. They seem to think this is hilarious, note to self, get a pupil to do this next time so I can be the one laughing…

But still this feeling that the angles above 360 don’t mean anything. They agree (me jumping more gently this time) that it makes more sense to say 90,180,270,360,90,180,270,360….

One of the best decisions I made this term was to keep a big box of STUFF at school, this is what enables me to teach these drop-of-a-hat lessons when the kids provide a topic. For me, the REALLY interesting sequence is 180,360,540,720… and later, when enough of the boys have got hooked on skateboarding, this will be a beloved sequence for them too, but they’re a bit young yet.

I draw an equilateral triangle on the board (we worked a lot with triangles last week, and I discovered that for all of them, this is THE triangle). They could tell me that all the sides would be the same length, but no idea about the size of one angle (90? 45? 25?) so we set up a little production line, drawing triangles, measuring the angles and adding them together. They knew (from last week) how HARD it is to draw an equilateral triangle by eye, so we settled on any triangle, as odd and different as you like. The numbers started to mount up. 196, 181, 180… for me, the tension was mounting. It is SOO tempting to correct and reject outliers, and this wasn’t looking promising. But holding my hair on, I reminded myself that a  small group is an ideal venue for measuring angles, cos protractors can get a bit of reputation for being tricky customers to use, and by Year 9 or 10, some kids have got themselves REALLY confused. Even if The Sequence didn’t emerge, they would gain a lot of confidence measuring angles.

How to measure an angle using a protractor

working out the angles in a triangle
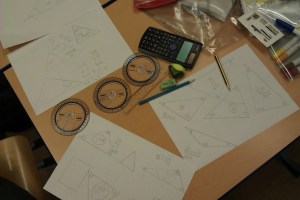
It took me a lot of trial and error to work this one out. Kids really get confused over WHAT they are measuring, so I start by reminding them how they find the length of a line using a ruler. One end of the line sits under the zero, the other end of the line gives you the answer. I bring the ruler near the protractor and show them that the protractor is just a little round ruler – the degrees are almost 1mm wide. I draw the angle in, running the pencil around the edge of the protractor, and show them they are measuring the curve, and it is … degrees. Becky just needed reminding once that the centre of the protractor MUST be on the corner of the triangle, otherwise the answer is wrong. They drew the big curves on to the first few triangles. It looked a bit odd, and we discussed it, but later they dropped that and just measured the angles.

Fairly quickly we had 10 results and I asked for comments. Becky thought all the numbers were pretty close together, but lots of different ones. I confessed that the 196 at the beginning did look a bit odd, and checked the triangle – a mistake had been made and they were happy to change the result to 182.

So we had a variety of different results, I suggested we find a mean average (I could see it would work out how, but it seemed sensible to summarise the data). They thought they could do it… but after a crash revision of means, becky added them all, and got 1812, divided by 10 and got 181.2.

measuring the angles in a quadrilateral

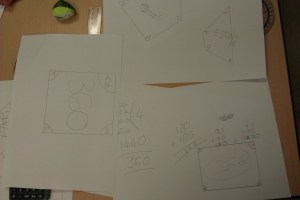
This, frustratingly, drew a blank and our half hour was nearly up but I had mentioned that task 2 would the the same, with 4-sided shapes, and they begged an extra 5 minutes. We rapidly found 254, 366, 360 and 360, and since Guy had intended to draw a rectangle, he was adamant that his 360 was “right”. The mean average (worked out unassisted by Becky) was 360. Another blank.

So, I write them up near the 90x table on the board. Becky gets that lightbulb look on her face:

Well the “2” is a bit wrong on 182, but the 360 is in the table and so is 180…?

I allowed that we might make little mistakes and they got really excited about the idea that every other number in the table was appearing, the next one, for 5-sided shapes, could be 540, then 720 for 6-sided shapes….

35 minutes into a 30 minute session the time had REALLY come to throw them out of the door. After half term, we will draw and measure 5- and 6-sided shapes.

a big hint

* Names changed, always!!

** Jan Poustie, 1990, Mathematical Solutions – an introduction to Dyscalculia Part B How to teach children and adults who have Specific Learning Difficulties in mathematics  Available direct from the author’s website

Maths with spaghetti

Introduction – Where did the spaghetti idea come from?

I’m a sucker for quirky Mathematical instruments and a couple of weeks ago, I got out my weird protractors. Most of my sets of protractors are full circles but the strangest set have all different sizes of circular holes in them, as well as the normal degree markings around the edge.

I gave the Year 5 extension group a protractor each and asked them what they were. They were pretty hesitant except for one boy who said, very confidently, “It’s a spaghetti measurer!”.

This appealed to me for several reasons. One was the fact he had obviously been participating in life in the kitchen, asking questions and getting answers. Another was the fact that my Year 6 extension group has just finished their work on areas of shapes, and they found measuring the area of circles in square centimetres a big challenge. It would have been so much easier to measure the areas of circles in spaghetti sticks…

The Spaghetti Starter – Year 6 extension group

Each of  them had a mini whiteboard, silence, and 4 minutes, to come up with 3 or 4 ideas each for a question you could pose, using the spaghetti.

Possible spaghetti questions

Possible spaghetti questions

I’m transcribing them because they are a bit too small to make out from the photo… I have paraphrased slightly for clarity, and omitted duplicates:

  1. How many pieces of pasta are there?
  2. Are there the same number of pasta strands in another packet?
  3. What is the average weight of 1 pasta piece?
  4. Is the weight of each pasta strand the same?
  5. What is the length of one spaghetti string?
  6. The length of all pieces of spaghetti put together
  7. Is the length of each piece of pasta the same?
  8. What is the mode of the lengths of the pasta strands?
  9. How many calories in 1 piece?
  10. How much carbohydrate in one piece?

Would the spaghetti reach the length of the field?

The next Year 6 group came up with an even better question:

Would the spaghetti, laid end to end, reach the length of the school field?

This encompassed questions 1,5,6 and 7, and required us all to have an opinion before we even opened the packet. Really we hadn’t got a clue but we agreed on, it would probably reach from side to side, but not end to end. Looking back, I’m amazed we reached an answer within the allotted half hour, but we managed it. It went like this:

  • We estimated how many pieces were in the packet (just for fun really), then split the packet up between the 4 of us to speed up counting. We agreed not to eat it as we went… (hygiene!!)
  • We discussed that there were some broken ones (we left them out), and that the whole ones were pretty much the same length.
  • We measured the spaghetti with a ruler and they used a calculator to find the total length of the spaghetti, converting correctly to metres on the way.
  • Two of them dashed back to class to get a trundle wheel but discovered the cupboard was locked… meanwhile, the other pair and I decided to see if we could do giant 1m steps to measure the field, since measuring it properly with a single metre stick wasn’t really an option… which is why the three of us may have been spotted by several classes as we did huge steps across the whole length of the field…. then I defrosted inside while they all giant-stepped across the field to measure its width.
  • We reconvened and compared the spaghetti with the field size. Our results are a closely guarded secret because other groups may want to do the same work.

How many pieces of spaghetti are there?

The next Year 6 group, given the packet of spaghetti, decided to count the pieces of spaghetti. Momentarily I was a bit disappointed because it seemed a less rich task, mathematically, but a big part of what I want to achieve for these groups is to help them to trust their own mathematical processes, so I cooperated. Again, the group began by sharing out the spaghetti so we could all count some. We all stuck our sub-totals on the board, and I waved at the calculators but they weren’t interested, they decided to see if they could add the numbers mentally. And here comes the mathematical richness of the task – these individuals have their own mathematical goals (why do I keep forgetting this?). I don’t mean a goal a teacher has put on a computer for them, I mean a bit of Maths they keep returning to, and will continue to be fixated by, until they are good and ready to drop it. For this group, in this moment, it was mental addition. A couple got it exactly right, but Hattie was out by 2. We discussed why, and it transpired she had rounded them to the nearest 10, then added. Cate was eager to teach her something, and proceeded to show her, with the spaghetti, that if she moved a couple of bits of spaghetti around instead of rounding, she would get the right answer. Here’s what I mean, but with smaller numbers:

19 + 29 + 24
Take one from the stack of 24, and give it to the 19 stack:
20 + 29 + 23
Do the same, move one from 23 to 29:
20 + 30 + 22
Now add 20 + 30 + 20 = 70, and 70 + 2 = 72

Hattie got it of course, Cate teaches very well!

There were still 10 minutes left so they picked up my challenge of:

What does one piece of spaghetti weigh?

So, we had a total, they knew the packet weighed 500g, and they unanimously decided to divide (on the calculators) and correctly arrived at a good answer for the problem. I asked Cate to dictate the number onto the board. She reeled off the expected 10 digits from the scientific calculator. Then Hattie chipped in with ten more. Eh? What was going on? Oh, she said, just mouse right and you get the next bit.

This was the most surprising moment of the whole morning. I love these calculators. I’ve read the instruction book several times, but I didn’t realise there was more accuracy like that…. But even more surprising, it was Hattie who found it, Hattie who was close to tears the other day at the sheer terrible scariness of the decimal number world.

So up on the board we now had a 20-digit decimal number and about 120 seconds left. Noone could tell me what the number actually MEANT. So homework was to ask 3 adults what the number means, and write down what they say. I await next week’s lesson with great interest!

Just finished counting....

Just finished counting….